Food Friday!

One of the most important aspects to losing weight or making the shift to be healthy is diet. 80% of weightless takes place in the kitchen. Unless you are intermittent fasting, breakfast is an important meal.

I for one am a person who trains fasted. My post workout meal consists of rice cakes and a protein shake. However, my next meal can get boring very quickly. I normally eat oatmeal with blueberries and 2 whole eggs. But sometimes, I need to switch it up.

Try these tasty alternatives to that boring bowl of oatmeal. Give overnight oats a try!

I personally enjoy the peanut butter version. I add all ingredients and mix together then store in the fridge overnight. When your ready to eat it, just take it out and enjoy!

If you try any of these, leave us a comment with which one is your favorite!

Juice of the week

Recently I got into the world of juicing and have enjoyed the process so far. Most of the foods are bought organic at whole foods and the rest at costco. Here is a standard green, alkaline juice recipe we currently use. Later this week I’ll go into more detail about maintains an alkaline diet and why it’s beneficial to you!

Recipe for 2 people
6-8 carrots
2 oranges
Handful of dandelion greens
2 lemons
1″ of ginger
1 medium beet

Juice together and enjoy! We add a tsp of spirulina and a tbsp of apple cider vinegar to our drinks!

20140305-140038.jpg

Chicken Salad without Mayo

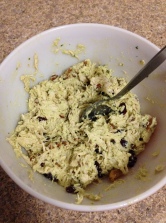
Chicken salad is always a great go to for quick sandwiches for both kids and adults. Many recipes though call for the use of mayo in chicken salad. Well the other day I combined my cool avocado cream sauce (link to recipe down below) with the rest of the ingredients for chicken salad and it was amazing!! Here is how I made it:

Ingredients:

  • Chicken breasts or tenderloins, boneless and skinless
  • 1/2 cup chopped cashews or pecans
  • 1/2 dried cranberries or chopped grapes (or both)
  • pinch of salt and pepper
  • Cool Avocado Cream Sauce

Instructions:

  1. Boil chicken in a pot of water until cooked. Once cooked through, strain and shred with fork or hand mixer, or chop into cubes
  2. Mix chicken in a bowl with 1/2 cup of the Cool Avocado Cream sauce, and rest of ingredients.
  3. Chill in refrigerator and enjoy on it’s own or in sandwiches!

>photo 1 (3)!

This makes a great quick sandwich especially on some whole wheat bread or a whole wheat pita. I don’t have the nutritional value of a serving of this chicken salad but if enough request it I will figure it out and add it to the post. Thanks so much! As always follow along on Pinterest, Twitter and Instagram

Cool Avocado Cream Sauce

untitled4

The other day I was looking for ways to incorporate avocado into my recipes. I don’t normally like avocado, I think it’s more of a texture than a taste issue for me. My husband however, loves it. So I decided to browse Pinterest for ways to include avocado and came across some Avocado Cream Sauce. It was perfect. The consistency came out a little thicker than I thought it would but I think it’s because I used some genetically enhanced avocado because it was HUGE!

Ingredients:

  • 1 avocado chopped into cubes
  • 1/2 cup of no fat greek yogurt
  • juice of one lime
  • salt to taste
  • 1 tbsp. of cilantro, chopped

Instructions:

  1. chop up avocado and put into food processor or blender.
  2. add yogurt and lime juice and blend until smooth.
  3. add cilantro and salt to taste

Here is a photo of mine, but please excuse the pathetic look to it, the bowl was full and in two days it looked like this:

photo 2 (2)

We used the last bit of this to make a chicken salad last night that has cranberries, pecans and cashews. Stay tuned and happy Monday!

Healthy Peanut Butter Cookies

Happy new year everyone! I apologize for the lack of posts and vow to make more this year. I took the last two weeks to relax with my husband as he had lots of time off which was wonderful! Because we spent the holidays lounging around, we found ourselves with a craving for sweet treats. I don’t usually buy treats when grocery shopping as we are trying to monitor calories and macros (this will be a post coming soon so stay tuned). I searched the internet and found a recipe for peanut butter cookies that did not include flour! Below are the ingredients and instructions for these cookies that only lasted 2 days:

Ingredients:

  • 1 cup natural peanut butter. I used Crazy Richards chunky which was good but I think just natural Skippy or Jiff would be better.
  • 1 cup sugar. Some of you may not like sugar since it’s not as healthy and Stevia for baking is a great alternative. I used Dominos brown sugar here.
  • 1 large egg, lightly beaten
  • 1 teaspoon of vanilla extract
  • 1 teaspoon of baking soda (so your cookies aren’t flat)
  • 2 teaspoons of flax meal (optional but a great source of omega-3 and highly recommended).

Instructions:

  1. Preheat oven to 350*F.
  2. mix all ingredients together in a large bowl.
  3. spoon 1 tbsp of mixture onto cookie sheet.
  4. Push a fork into the dough to get the classic peanut butter cookie look.
  5. cook in oven between 10-15 min until golden brown.
  6. take out of oven and transfer to cooling rack *warning: since there is no flour I found the cookies broke apart a bit when transferring them so either be gentle or wait until they cool before transferring.

20140103-205310.jpg

20140103-205357.jpg

I hope you all enjoy them and as always come follow us on twitter and Instagram

Blueberry Baked Oatmeal

photo (2)

I’m always looking for new and exciting recipes to try and I happened to stumble across this gem. I made it right away today and as you can see, I already dipped into it, for the sole reason of reporting how good it is of course! This recipe calls for basic ingredients, most of them should be in your pantry already. I put all my ingredients into MyFitnessPal recipes and it came out to 147 calories for 1/2 cup serving with 19g of carbs and only 6 grams of fat. The ingredients you will need are:

Ingredients:

  • 1 cup old fashioned oats (not the quick cooking kind)
  • 1/2 tsp. baking powder
  • 3/4 tsp. cinnamon
  • pinch of salt
  • 1/4 cup maple syrup. Now I use Walden Farms calorie free, gluten free, carb free, sugar free syrup

photo (1)

  • 1 cup of milk (I used Pure Silk Coconut milk, made it taste awesome)
  • 1 large egg beaten
  • 2 tbsp. unsalted melted butter
  • 1 tsp vanilla extract
  • 1-3 bananas (depending on the size of your baking dish)
  • 1 cup blueberries frozen or thawed

Directions

  1. Preheat oven to 375F
  2. Lightly grease your 2 qt baking dish, I just used a stick of butter and rubbed the bottom. In a bowl, mix the oats, baking powder, cinnamon, and salt. Stir to mix it all up. In a separate bowl, mix syrup, milk, egg, butter and vanilla
  3. Cut up the bananas and place the slices across the bottom of your baking dish. In my glass 2 qt dish I used 1 1/2 bananas to do this. Cover the bottom with the bananas. Put half the blueberries on top of the bananas. Sprinkle the dry mix on top of the blueberries making sure to get an even layer out of it. Pour the liquid mix on top of the dry mix, don’t stir it up, just leave it on top.
  4. Sprinkle the rest of the blueberries on top of the liquid mix and bake in the oven for 35-40 min or until the top is browned and the oats have set.

Enjoy!

Follow along on twitter or instagram and on pinterest

My Turkey is Still Frozen!

This was my reaction this morning, Wednesday, November 27, 2013. I bought it monday and the turkey is only a 13lb bird. Granted, it’s ony feeding 3 people but I am a fan of left overs and at 21g of protein a serving, how can you NOT want more! So I did what I normally do in this case and googled the crap out of this pickle I put myself in. Everyone says do NOT thaw a turkey at room temperature as this allows for bacteria to grow and fester in that delicious bird that could have you puking it all up later on that day. The Butterball Hotline, yes, this exists (1-800-BUTTERBALL (800-288-8372)) or Click Here says you can give your scrumptious bird a cold water bath by placing it in a sink or 5 gallon bucket and giving it 30 min per lb of turkey to thaw. They say to change out the water every 30 min so it doesn’t get to room temperature.

Now, I am baking my apple pie today ahead of time and need the sink to clean all those dirty dishes I created. I needed an alternative to putting the bird in the sink. Low and behold, I found an idea! I went into the garage and grabbed our fishing cooler (no worries, it’s clean) and brought it outside. I placed that turkey right in the cooler, turned on the hose and filled the cooler with cold water. I also added two trays of ice cubes to give it an extra chill:

photo

It should take about 6 hours to thaw and at that point I will place it back into the fridge until tomorrow morning! What a live saver! Did I mention this is the first time cooking a turkey for Thanksgiving by myself??

Here are the recipes I’m using to season the turkey and side dishes:

Turkey Seasoning

Sage and Sausage Stuffing

Green Bean Casserole

Crash Hot Potatoes


Broiled Tilapia Recipe as Promised!

So earlier this week I promised if we got to 500 views I would post my tilapia recipe. As it is, I unfortunately do not have pictures to go with this post as it’s been about a week since I’ve made it. However, I turned a 17 year old who hated fish into a fan favorite overnight. This recipe obviously can be adjusted as seen fit. If you don’t have almond flour or can’t bear the thought of dropping $12.99 for a bag (it’s tough for me sometimes to shell that out) then toasted bread slices cut up and ground in a food processor works just fine.

20130922-192241.jpg

I usually squeeze about 4-6 costco sized fillets into my glass baking dish for this recipe and I also dust them with lemon pepper before broiling them.

1/2 cup Almond Flour
1/2 Parmesan cheese (optional)
1/4 cup butter, softened
2 tablespoons fresh lemon juice
1/4 teaspoon dried basil
1/4 teaspoon ground black pepper
1/8 teaspoon onion powder
1/8 teaspoon celery salt
2 pounds tilapia fillets
1/2 teaspoon paprika

Directions
1. Preheat your oven’s broiler. Grease a broiling pan or line pan with aluminum foil.

2. In a small bowl, mix together the Almond flour, butter, cheese (optional) and lemon juice. Season with dried basil, pepper, onion powder and celery salt and paprika. Mix well and set aside.

3. Arrange fillets in a single layer on the prepared pan. Broil a few inches from the heat for 2 to 3 minutes. Flip the fillets over and broil for a couple more minutes. Remove the fillets from the oven and cover them with the Parmesan cheese mixture on the top side. Broil for 2 more minutes or until the topping is browned and fish flakes easily with a fork. Be careful not to over cook the fish.

Please, if you try this let me know how it turned out. If you changed it up, let me know how so I can try it. Hope you all enjoy it!

Healthy Taco Dip For Football Season!

So it’s safe to say many of you are football fans. You have been patiently waiting for college and pro football to begin. Football season marks the start of tailgating, wings, beer, and rivalries. Today I’m going to provide you with a wonderful taco dip recipe that is healthy so you don’t have to feel too guilty or stray too far from all the progress you have made on your diet.

First I start with my glass pie plate. You can use one of the foil ones for easy clean up but I don’t really recommend it as you might not fit everything into it. Preheat your oven to 375F.
The first ingredient I start with is 1 package of cream cheese. I used light cream cheese this time but usually I try to stay away from light or low fat items. These items tend to be jam packed with chemical substitutes. Spread the softened package of cream cheese on the pie plate. Next, pour about 8 oz of taco sauce on top of the cream cheese. Here is the sauce I used

20130828-083909.jpg

20130828-083925.jpg
Next I put diced tomatoes on top of the sauce. I bought two packages of diced tomatoes but you can dice two or three of your own. Just be sure to really dry the chopped tomato pieces with paper towels so you don’t have a runny pie. Next I chopped half an onion and half a pepper nice and small. Place that on the tomatoes. Next I added a small can of jalapeños.

20130828-084455.jpg
Again don’t go with light or low fat, for those of you on Primal or Paleo, it’s recommended you stick with full fat as the common misconception is this kind of fat is bad for you, which in moderation this is untrue.
If you don’t like spicy things you can use a can of chiles of the same size. Next comes the cheese. I bought a 16oz package and used about 3/4 of it.

20130828-084605.jpg
Spread a large amount of cheese over the top. Don’t be shy with it! Place the entire dish in the oven until the cheese melts (time will vary by oven). Take dish out of the oven and this is what you should get

20130828-085229.jpg
Please disregard the giant hole in the bottom right, we dug into it as soon as it came out of the oven!! Now most tortilla chips work, especially the Scoops, however, I stumbled upon these little gems at my grocery store

20130828-085345.jpg
They were at the end of the deli department before produce and if you can find them, I recommend buying them, multiple times. Not so much Primal or Paleo, but they only use corn flour and they are gluten free!! If you make this, let me know how it turns out!! Bon Appetit/Buen Provecho!
Recipe
1 package cream cheese
1 jar taco sauce
1 onion diced
1 bell pepper diced
2-3 diced tomatoes (dry with paper towels)
1 can jalapeños or chiles
1 16oz package cheese blend

Preheat oven to 375F. Spread softened cream cheese in glass pie plate. Add 8oz of taco sauce to pie plate. Add diced tomatoes, pepper, onion and jalapeños in layers. Add cheese on top (amount will vary depending on how much cheese you enjoy). Place dish in oven until cheese is melted. Let cool slightly and enjoy!!